Institutional partner connections
How our partner connections work.
To ensure the comprehensive monitoring and protection of your digital assets, it is essential for CoinCover to integrate with your chosen wallet service providers, referred to as 'Partners'. By establishing this connection, CoinCover gains the ability to view transaction events and monitor ongoing activities of your digitial assets. This integration is crucial for providing real-time security alerts and proactive screening of transactions to prevent unauthorised movement of funds and potential threats.
Why connect your wallet service provider?
Connecting your wallet service provider with CoinCover allows us to:
-
Monitor transaction events: We track all transactions in real-time, ensuring that any suspicious activity is identified and addressed promptly.
-
Protect digital assets: Our systems provide layers of security to protect your funds, with the option to provide additional checks prior to moving funds.
-
View ongoing activity: By having visibility into the ongoing activity on your wallets, CoinCover can further enhance threat detection models based on your organisation’s activity and offer insights with recommendations to adjust your claim limits to remain fully protected.
How to Connect?
To initiate this process, you will need to configure your wallet service provider to allow CoinCover access. This typically involves generating read-only API users and setting up specific permissions that enable us to receive transaction data without compromising the control or security of your assets.
BitGo
Enabling CoinCover Transaction Protection and ReCOVER services on BitGo
Creating a read-only API token and adding Webhooks, which only has access to protected wallets, is required to enable protection services for BitGo wallets.
This process creates a dedicated BitGo user account with viewer access to covered wallets and then adds a viewer only API token.
Step 1: Create a viewer account and add Viewer API token to existing BitGo Account
-
Create a new BitGo user, specifically for the purpose of CoinCover monitoring
-
If using a BitGo Enterprise account, add the user to the enterprise and get any approvals required to make it available to add to wallets
-
For each covered wallet, add the dedicated user as a Viewer, again, ensuring any approvals for such actions are completed
-
Log in as the dedicated user
Step 2: Add Viewer API token to existing BitGo Account
-
In the BitGo console, under the user in the top right-hand corner, click on Account Settings
-
Select Developer Options
-
Click on the plus sign next to Access tokens
-
Set the token label to: Coincover Monitoring Token
-
Leave the duration as
315360000 -
Copy the following 5 IP addresses into the box:
18.133.68.226,3.11.149.135,3.11.127.247,18.169.123.165,18.169.110.69Note: a comma ‘,’ is left between each ip address.
-
Remove any tokens specified under Lifetime Spending Limits using the ‘x’ to the left of each option
-
Set Permissions to View
-
When ready, check the box next to I agree and click on Add Access Token
-
Once clicked, you will be prompted for your 2FA device to authenticate the token creation
Step 3: Add a Webhook to each wallet protected by CoinCover
-
In the BitGo console, select a wallet and navigate to the Settings tab.
-
Scroll towards the end of the page and click "+ Add Webhook".
-
Provide a name for the Webhook and select "Transactions".
-
Add the relevant URL which CoinCover will generate and send to you, containing a unique token reference for your organisation.
-
Example format below:
| Environment | Example webhook url |
|---|---|
TEST |
|
PROD |
|
-
Check the services agreement and then Add Webhook.
-
Repeat Step 3 for each wallet protected by CoinCover.
Fireblocks
Enabling CoinCover protection services on Fireblocks
Create a read-only API user, which has read-only access to specified vaults in a Fireblocks workspace.
Configure the webhook URL on the Fireblocks console which is required to provide CoinCover with a view of completed transactions.
Step 1: Add a New API User to Fireblocks and Securely Send the API Key to CoinCover
To provide CoinCover with read-only access to the relevant data on Fireblocks, you will need to complete the following steps to add a new API user on the Fireblocks console.
-
Follow this Fireblocks guide to Add a new API user.
-
Name the new user with a relevant name e.g. ‘CoinCover’
-
Select the Role as ‘Viewer’ from the dropdown list
Please note: if you wish to use IP address whitelisting then please follow this Fireblocks guide to Whitelist IP addresses for API requests and use those listed below:
| IP Addresses |
|---|
18.133.68.226 |
3.11.149.135 |
3.11.127.247 |
18.169.123.165 |
18.169.110.69 |
-
Attach the .csr file provided by CoinCover:
| Environment | CSR file name |
|---|---|
TEST |
coincover-fireblocks-api-test.csr |
PROD |
coincover-fireblocks-api-prod.csr |
Please note: the new user will need to be approved on Fireblocks by someone with the relevant permissions in your organisation.
-
Once you have set up the new API user, navigate to the Users tab, where you should see the new API user in the list.
-
Click the key icon next to the API username as shown in the above image to Copy the API key.
-
Then share this API key securely with a member of the Solutions Engineering team at CoinCover.
Step 2: Ensure Webhooks are Enabled
-
Check that Webhooks are enabled by:
-
Login into your Fireblocks console
-
Navigate to the console settings from the avatar dropdown menu
-
On the General tab, look for the Configure Webhook URL section to validate webhooks are enabled
-
If you do not see the Configure Webhook URL section under the general tab, then they are not enabled, and you will need to Contact Fireblocks requesting that webhooks are enabled on your workspace
Step 3: Configure Webhook URL
-
On the Fireblocks Console > Avatar > Drop down menu > Navigate to settings > General (following the same instructions as in step 1)
-
In the Configure Webhook URL section, select the Manage URL button
-
Add the relevant URL which CoinCover will generate and send to you, containing a unique token reference for your organisation.
-
Example format below:
| Environment | Example webhook url |
|---|---|
TEST |
https:// webhook.txm-uat.coincover.com/fireblocks?token=${token} |
PROD |
https:// webhook.txm.coincover.com/fireblocks?token=${token} |
-
Press 'Save'.
Once the above steps have been completed, a member of the Solutions Engineering team at CoinCover will validate the connection.
ForDefi
ForDeFi Integration with CoinCover*
Step 1: Create an API User on ForDeFi
-
Log in to your ForDeFi account.
-
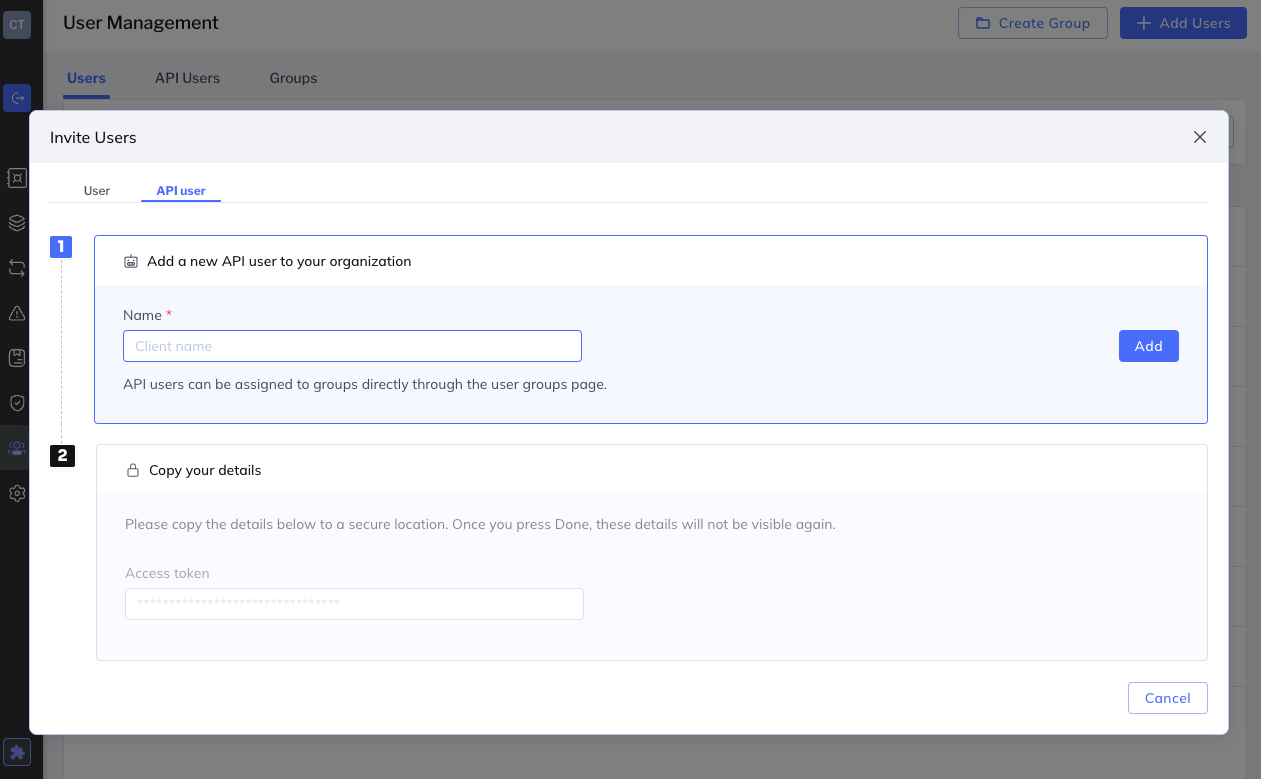
Navigate to the User Management area and click “+ Add Users”.
-
Select the API user tab.
-
Name the new API user something relevant like 'CoinCover API'.
-
Generate the API key for this user and securely store it.

Step 2: Create a Rule for the API User on ForDeFi
-
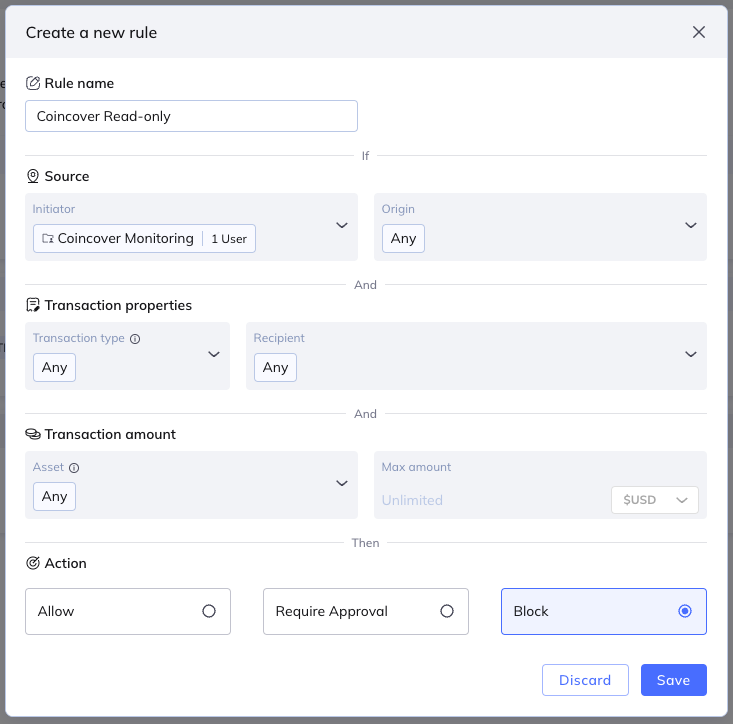
Create a new transaction policy rule with an appropriate name like ‘CoinCover Read-only’.
-
In the ‘Source’ section, select the CoinCover API user previously created as the initiator.
-
Leaving everything else as default, in the ‘Action’ section, select ‘Block’.
-
Then ‘Save’.
Note: This ensures that the CoinCover API user is blocked from performing any actions on your ForDeFi account.
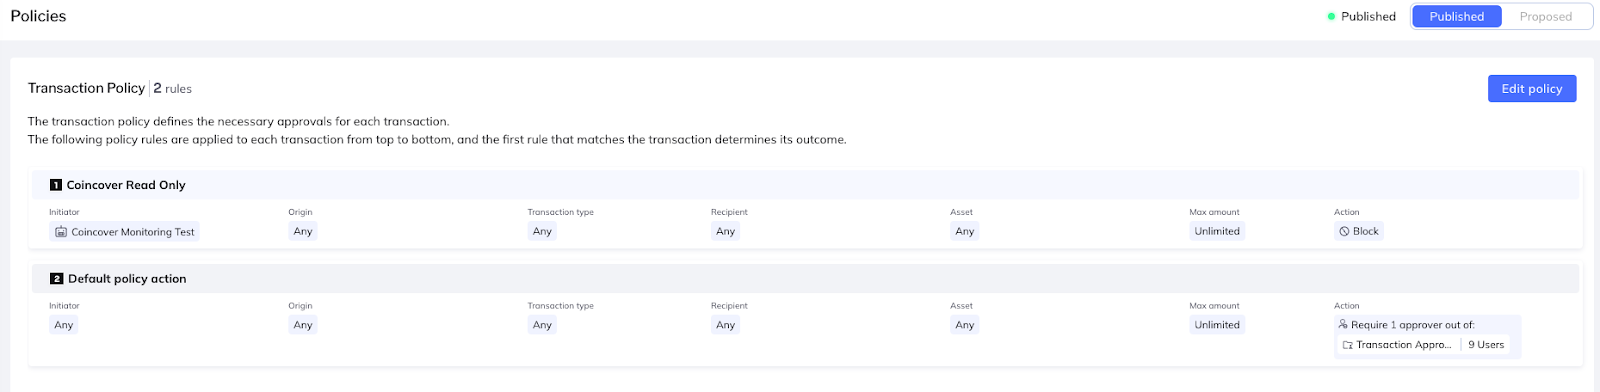
Important note: You must ensure that in all policies you have selected a specific group of users to be approvers, rather than leaving the default “Any“. The ‘CoinCover API user must be excluded from all lists of approvers on other Transaction Policies in order to prevent CoinCover from having the ability to approve/reject the signing of a transaction. This aligns with ForDeFi’s general recommendations for transaction policies.
Step 3: Share API Key with CoinCover
-
Contact CoinCover’s Solutions Engineering team and securely share the API key you generated for the 'CoinCover' API user
Step 4: Configure Webhook URL on ForDeFi
In this section, we will configure webhooks in order to provide CoinCover with transaction events so that CoinCover can be notified of transaction events occurring in your account and protect your transactions.
-
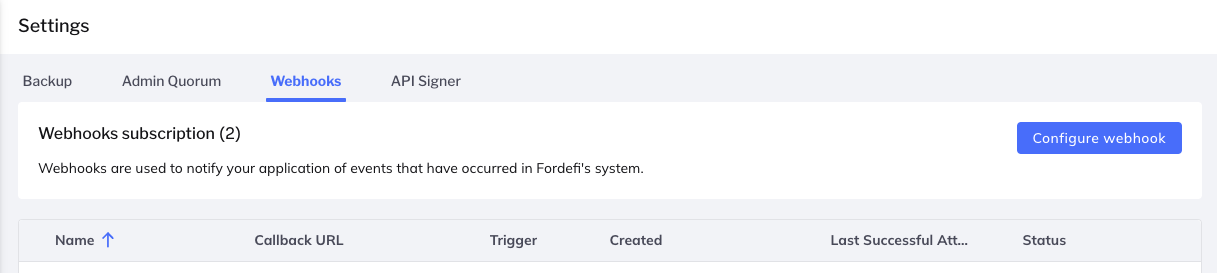
In your ForDeFi account, navigate to the settings area.
-
Select the Webhooks tab and click Configure webhook.
-
Populate the ‘Callback URL’ with the URL provided to you by CoinCover.
| Environment | Example webhook url |
|---|---|
TEST |
https://webhook.txm-uat.coincover.com/fireblocks?token=${token} |
PROD |
https://webhook.txm.coincover.com/fireblocks?token=${token} |

-
Choose the ‘Transactions’ event trigger.
-
Click ‘Test webhook’ to ensure the webhook URL is valid.
-
Save the webhook configuration.
Step 5: Validate Connection
Once you have completed the above steps, a member of the CoinCover team will validate the connection and ensure that CoinCover’s protection services are seamlessly integrated with your ForDeFi platform.
If you encounter any issues or need further assistance during the integration process, please don’t hesitate to reach out to CoinCover’s support team for prompt assistance.